
Diagnosing CCTV Camera Problems
Camera Firmware Faults
Poor Camera Video
Video Loss
Camera Flicker/Flashing Video
Dead CCTV Camera
CCTV Camera Basics
Welcome the this guide about How to Troubleshoot CCTV Cameras. It covers common security camera faults and loss-of-signal scenarios, with some solutions to help solve the issues. Not every manufacturer adopts the same standards, so unique systems will require more research for a resolution. Hopefully if you are stuck without an answer to your security system problem this page will help.
CCTV cameras come in a variety of shapes and specifications, from dome and bullet shapes, to analog TVL and more current digital HD cameras which can record with millions of pixels, but they all work relatively the same. IP(Internet Protocol) cameras are similar in use and functions, but the controlling infrastructure is done with website member access to your system’s account. These techniques mentioned below will work with both CCTV and IP themed cameras.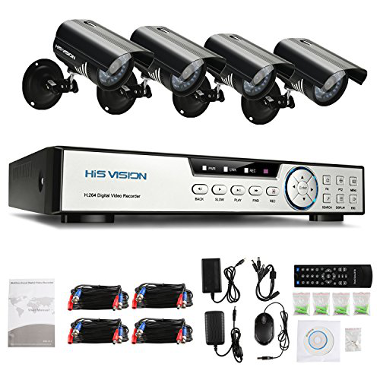
So let’s refresh our understanding of how a CCTV system works. Cameras take light in, and “captures” this light at a certain speed and intensity. This is done with what is known as a “light sensor”. There are two main types of light sensors, CMOS and CCD, yet as most things in life there are others such as LiveMos, and Foveon X3. Most likely by this time next year there will be an even better sensor in the market, but for now CMOS rules the digital camera industry.
The camera will constantly bring in light and have it available for the DVR(Direct Video Recorder) via BNC cabling, or even maybe a 4-pin circular arrangement, as long as the camera has power. 12V DC Wall transformers have been popular but are being phased out for more conservative PoE found in many NVR systems. For something like motion detection, basically a reference image or images, are compared to a newly taken image for any variance between the two, which if there is, recording would be activated. When the DVR is told to record as in a motion alert or just manual recording, this constant camera feed will be recorded and stored on the HDD hard drive. The DVR does all the heavy lifting as far as sorting channel feeds, editing video, time stamping, recording, compressing, and re-writing over existing content. The camera will continue to take frames as the settings for shutter speed dictates, and the DVR will continue recording until the mode is deactivated.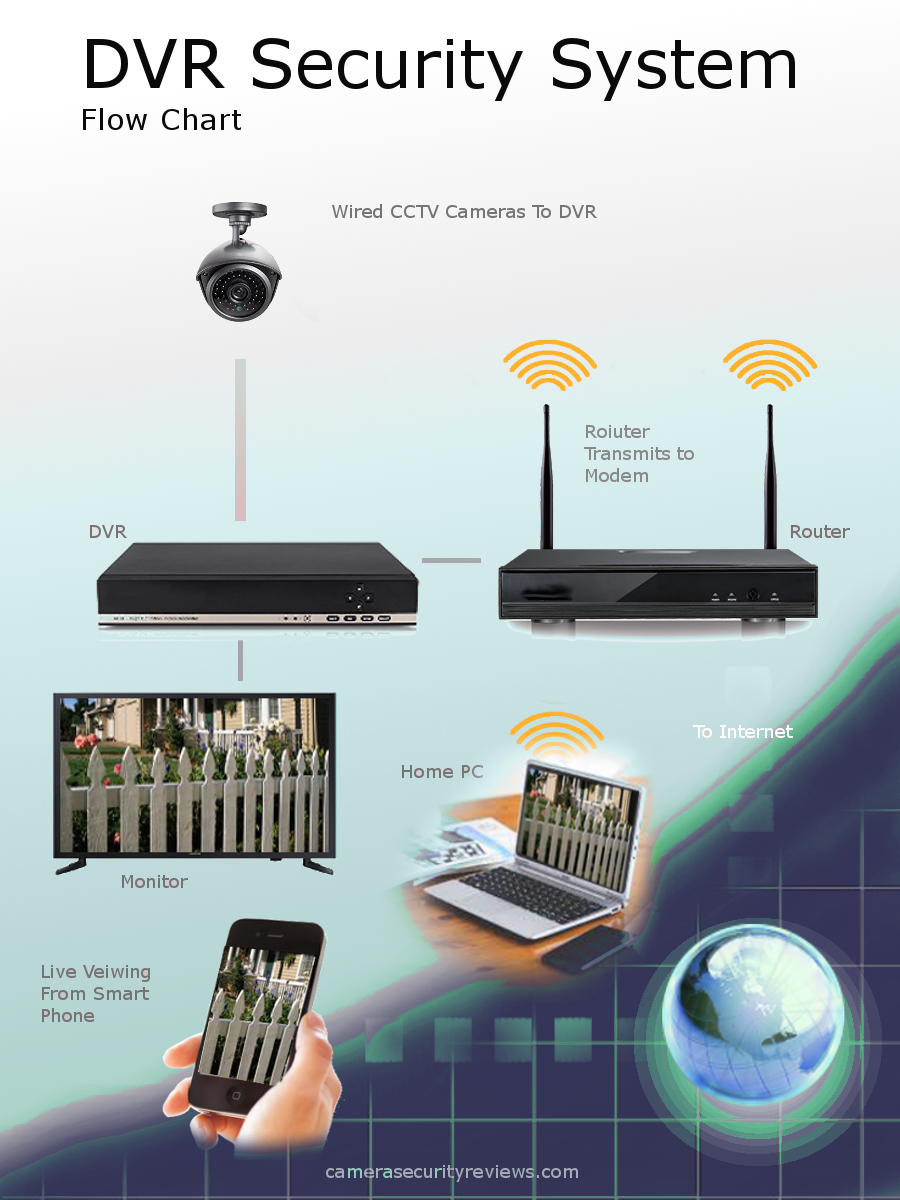
Once the video signal is converted and processed at the DVR, it can be available for live viewing as a stream over the internet network or view as a source for your preferred monitor. Editing and event marking can now be done as the video is a workable file now.
So these are the basic steps a home security system based in a DVR platform. Now lets get into some troubleshooting of different faults and defects commonly found in surveillance systems.
Diagnosing CCTV Camera Problems
CCTV camera problems can range from software glitches to actual hardware failure.  Software can also go by the name of “Firmware”, which is the part of the code that benefits by being update able. Security from hackers and new features can be applied when firmware is updated. Everyone from Apple to Zmodo has patches and updates for many of their products. The manufactures of your specific equipment usually offer updates when possible from their websites to make it as user friendly and cost effective. Remember getting windows and mac discs for updates? No more.
As for electronics within the cameras and DVR unit, today we are lucky enough to have good, reliable electronic components,… for the most part. Surface mounted integrated and discrete parts like resistors, zenor diodes, capacitors, micro-sized inductors and IC’s are incredibly forgiving. Over-voltage or over-current conditions don’t always destroy circuits because of this robust ability. Also smart circuit design containing fuses and circuit breakers help keep expensive components away from damage, but, as with anything, components do sometimes fail.
Swap and Test
The swap and test method can be performed whenever a camera, channel, cable, or the DVR itself is questioned in it’s reliability. Many security systems have identical cameras and this makes it simple to troubleshoot a defect. Marking cables and cameras with a bit of tape and maybe a number or letter identifier will help reduce confusion once things are unplugged and moved around.
- Cameras- Checking cameras for a fault can be done one of two ways. The first and most effective way is to unmount the suspected camera and a known working one, and swap them. If the problem follows the camera, you now have isolated the fault to that camera. The other method is to swap inputs at the DVR unit. This will still use the cable for that camera and will need the cable checked if anything strange is found during the test.
- Channels- A simple way to test a channel on the DVR is to swap cables from the problem input to another known good channel. If after switching around the inputs the defect follows along and is present on the new channel, then DVR troubleshooting is necessary.
- Cables- Inspecting wiring
- DVR Head Unit- Further DVR troubleshooting is necessary.
Camera Firmware Faults
As computers go, so do DVRs. DVRs need updated too. Poor performance under certain criteria of conditions may lead to a model wide firmware update. If commonly found glitches occur within your own system, try finding a firmware update to give your recorder a fresh set of codes. The files for firmware can commonly come in a .MUP extension. format and will prompt the user to agree to the update in either a button push or mouse click. Then the new file will upload into the solid state ROM part of the device.
When hackers develop new ways to break into a loosely secure code of a device, engineers work hard to overcome this flaw and create an update to the software, or firmware. This is a quick a simple thing to do as most DVRs will take the internet connection they already reside on and connect to the appropriate website for updating. Other older generation models may need a USB containing the file for the firmware to be uploaded from.
Poor Camera Video
The number one cause of poor video is improper settings. The next big thing would be the conditions the camera is trying to record in. Does it make the camera bounce between high and low light settings? These are the basic things to consider before unmounting and replacing a bummer camera.
Settings withing the GUI can control how efficient the camera is in low lighting, low visibility such as fog, and how much exposure time is there for a frame to be implanted onto the image sensor.
Video Loss
Cutting out and intermittent signal loss can be frustrating. Does your wiring look good. Breaks in the center conductor or braided strands can make weak signals and making your cameras activity drop below the DVRs threshold for recognition. Swapping cameras with an identical unit is a quick test. Does the fault follow the camera or stay on that single channel? Simply use your test cable for troubleshooting.
Next look at the DVR and inspect the setting for the camera. Have they changed? Do they fit the environment for the camera works best in. Has there been a season change and light in the day time is not what it used to be? Play with the settings for light sensitivity and do it on change at a time so you can change it back. Doing a whole lot of changes at once can make it hard to restore the way it was when you started, and if it does resolve your problem, its hard to determine which change actually made the difference.
Camera Flicker/Flashing Video
When a camera changes between bright to darker again and again, then it may be the settings for that camera. What the camera seems to be doing is deciding on what light condition it is currently, and what set of adjustments should it use. But it just can’t decide on one and stick with it. The menu may have an “outdoor” setting which needs activated. Another thing to check is if there is an “Exposure” setting or a “Low Noise” option. One more thing to check is the shutter speed.
- Change Exposure to Manual
- Change Shutter to 1/10000 or another value
Dead CCTV Camera
When a camera has no signal, it may be dead, it might not. How to tell? Using the swap methods mentioned above can isolate your troubleshooting to a specific camera, so now what?
Check List For A Dead Camera-
- Source Power- Does it have a 12V DC source that has the correct amp rating output. Not all 12VDC supplies are equal. Make sure its the right one. If possible test power with known good supply for test purposes.
- Switch Cameras – Again this is any easy way to test your working and non-working equipment. Use known good equipment for test purposes.
- Swap Channel Inputs- Switching inputs at the recorder can eliminate questionable signal and cable problems quickly.
- Camera Settings- Start with one setting at at time or try default if your not sure whats going on.
Well, modern security cameras for outdoor use are heavily sealed and weatherproof. If you try to open one for repair most likely the chassis will get damaged and not hold a good seal when reassembling it.
If y ou’re brave regulators and diodes tend to do the hardest jobs and fail the most often on smaller light duty electronic PCBs. Visually inspect the board. I typically start with a diode mode on the multi-meter and check for low resistance or shorts. Then, if possible supply the board with 12VDC and test the regulation circuit for poor readings that would not be usable voltage for either a chip or an adjacent circuit. Some schematics can be found online for general camera circuits so those may be of help too. Id the parts in question and source them to a reputable supplier such as Mouser or Digikey.
Inspecting CCTV Wiring
Next in our guide: How to Troubleshoot CCTV Cameras, we will look at wiring.
This is a quick and simple way to check a long run of coax. Ethernet cables can be check this way too. Since you can’t place a meter probe at each end of the cable, place a piece of foil wadded up and touching both center pin, and surrounding ground collar. Short this end together and take your meter to the other end of the cable where ever that may be, and do a resistance test as normal. If there is a broken wire it will measure a very high if not infinite resistance. It the cable is good it should a reading near 0.0 ohms but there is always some stray fluctuation maybe up to 0.7 ohms.
In order to test the impedance of a cable it will require passing an AC reference signal through the cable and calculating the loss of the signal per length of the cable. So the DC resistance measurement is far simpler.
Camera Vandalism
Sadly this happens when people don’t have respect for others’ property. If a camera is not transmitting a signal, maybe it’s time to do a walk-around. This security camera problem is obvious when a visual inspection is done. Although it won’t leave you with a nice feeling. Cut cables or a hard impact to the camera can cause irreparable damage. Not much can be done with such damage other than replace it. Did the camera record anything before the damage?
Water Damage
Yes even corrosion can damage electronics. We all know not to put a hairdryer in the bathtub or sink because it can short circuit, and kill you! But when water and electronic circuits mix, the electric current through the water can promote and “grow” a crystallized form of corrosion. Any moisture that can collect and “drip” onto a PCB could start this process.  Condensation is a form of this condensation, so outdoor CCTV camera are made as sealed units. This permanent (although you can eventually open them) seal does its best to keep any airborne water out of the chassis and away from delicate components.
If a camera is acting up and it is suspect to be weather related, look for any seams around the chassis that may let water seep in, or any grommets/gaskets deformed. Sadly the only true way to know if the defect is corrosion related is to visually see the corrosion.
Defective CCTV Camera Solutions
Replaced An Individual Component
When a single component or cable goes bad, it doesn’t mean the whole system needs replaced. Single cameras and stand alone DVRs are available for upgrading and repairing existing security system installations.
Replaced The Entire System
Has it been years since you put your security system into use? Everything has a service life and outdoor equipment especially. DVRs are slowly losing ground in the security camera market as they are being replaced with NVRs(Network Video Recorders). Multiple channel systems based around a NVR will allow simpler over-internet control and even wireless connectivity with your home WiFi network. It may be time for a newer system with better resolutions and even wireless cameras.