Where To Place Security Cameras
Page Contents-
Introduction
Solid Questioning
Common Mistakes
Private Video Recording Laws
Indoor Camera Placement
Outdoor Camera Placement
Mother Nature
Conclusion
Is This Just Something Simple?
You know your home, and you know what a high traffic pathway is and what a blocked area of the home is right. But do you know the Best Security Camera Placement? Did you consider lens angle? Background lighting? Do you know the local and federal laws of video surveillance? Do you plan on using them inside or outside? This was simple but there are lots of angles to look around and not get tripped up.  This security camera placement guide will help remove some of the fog associated with installing and using a security camera in your home.
When looking for a security camera, you already know that indoor and outdoor security cameras can drastically reduce or stop home break-ins and keep your family, and goodies safe from wrong-doer’s. A camera for surveillance is only as good as its view, or position in the environment.
Knowing where to place your security camera is really key to getting the most out of it. You don’t want half a leg or top of a head as evidence, so give it some thought.
Placement That Gets Maximum Results
Good Questions to Ask
- Where do you want to use a security camera?
- Where do you want to see a security camera?
- Can power cables and/or video cables be routed to the location?
- Can cameras be tampered with?
- Where are places easily open to public access, or vulnerable spots on your property?
- Are there secluded entry points of your property where hiding could occur?
- Has your home been a target in the past?
- What where entryways for any past break-ins?
- Do I want Outdoor Cameras or Indoor Cameras?
Common Mistakes
Oh Hello, Finders Keepers…
Not securing the components or devices leaving them open for easy vandalism. This is not the best security camera placement. A high percentage of items taken are ones thieves can see. The DVR/NVR of the system can often be overlooked as to how valuable it really is. Placing it in a rack of stereo equipment may mean you just lost your footage in a home burglary. Now what. Still have the cameras,… So try not to leave it out. If you have invested hard earned money and time into a security system do the job complete, and disguise or displace your DVR unit. Maybe have all your wires or cables come to a point in a closet.
Lose the Glare, Gain Clarity
Do not mistake night vision for “magic vision”. The right lighting needs to be realized for correct and detailed night vision recording. They often make the mistake of mounting cameras too close to bright lights, which often plum and disrupt the view.
Overwrite Overkill
Too much wasted trigger time has endless hours of ‘not much’. So remember to optimize the settings, or, alter the view spread to capture only out of the normal activity and trespassing. Let’s say you auto record your front door or perhaps your refrigerator. Mind the obvious high traffic points.
Overplaying Your Controller!
Sometimes when we get lots of features, we tend to, A: get paralyzed by options and results of those options, or B: we forget we switched something. So with that concept freshly squeezed, imagine a large array of PTZ cameras and the user centers focus on an area of suspicion and then forgets its in that position. Now your camera as opposed to a fixed permanent view mounted security camera, has nothing useful to present as far as evidence. Maybe an arm swinging into the frame? That stinks. So cool features have to carry responsibility in order to use them best.
UP UP and Away
Security Camera placement can be made up good intentions. They tend to get placed very high up on eves and ledges of the home. This does give great spread and field of view, and it keeps hands off of your system, but it also puts distance between your camera and the object you want to record. Plan height and spread accordingly to your needs.
Private Recording Laws
Please do research about the laws surrounding your situation or local. Having consent from the other party in your videos, or prohibition of hidden cameras may be active laws in your area. A great resource for state and federal laws can be found here.
Local Laws
Understand that a camera recording others takes an individual responsibility by the user. It may be that ‘consent’ is needed to record either audio or video of a person in your home.  It may be prohibited in your state or county. The law can be extremely frustrating when you get slapped with a lawsuit and you had no clue you did something wrong. It can be even messier when a minor child is involved. Yikes! Know your laws before you proceed.
Federal Laws
The U.S. government does not have clear cut laws regarding video recording with a personal surveillance system. Common sense comes in fast when you have public places in your camera systems field of view. Maybe its not the best thing to record a fire department, or a police station. Living close to private businesses means you have to consider camera direction in this case as well.
Indoor Camera Placement
Interior Security Camera Concepts
Not all security cameras are alike. They each have a specific task they try to accomplish with their accommodating features. Indoor cameras keep an eye on living spaces and possessions. They don’t have to deal with mother nature pounding on the chassis day after day so they can be built slightly different than the outdoor camera siblings. Outdoor chassis can do well indoors, but the viewing angle and range of the typical outdoor camera makes viewing spaces a bit awkward. It will work, but the perspective is not ideal for indoor use.
You can tell a camera made for indoor use by its size, 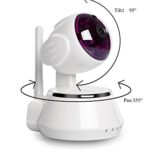 chassis housing, and connection ports. Inside IP cameras will have a size that is smaller than most outside cameras because the internal structure does not have to be as strong or rugged. Its thought that indoor cameras won’t see physical abuse as an outdoor security camera may. Also the chassis will most likely be plastic, and not tough metal. This is also due to the expectation of little to no abuse, but more importantly its because it reduces cost, for the camera won’t need weather resistant components. Seam seals and lens seals are not as vital to an indoor IP camera. So designs can eliminate costly weather proofing features. Lastly, the biggest identification factor will be the ports on the device.
Indoor Wall Mounting
Indoor Wall Structure
Many of us have some previous experience with drywall or sheet rock walls. I don’t mean installing panels in a new construction home, I mean you have probably put a nail or screw into the wall to hang a picture frame or some type of artwork within your home. I’m guessing you remember how easy it was to puncture the material. Drywall will not hold a significant amount of weight(1/4lbs. – 5lbs.) without ripping apart, so mounting a camera to the wall will also need care as to the style of fastener used.
When mounting objects to the inside walls of your home, you need strong physical structure to hold said object in place. One way to do this with a typical home is take advantage of the internal wooden studs that the wall is made up of. Screwing fasteners into these boards allow lots of holding force for the object being held up. One stud and a few good wood screws can withstand up to 20 pounds of weight. This is the best practice and studs should be incorporated whenever possible. The best security camera placement involves rigid wood beams for support. 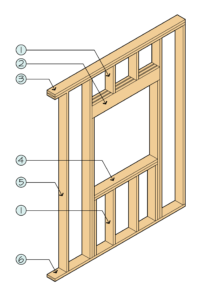 Studs are usually placed every 16 inches on center. When you find one the next will be over 16 inches from that one. Handheld stud finders can be used for quickly locating solid wood beams in your walls. Another way to do this is with wall anchors. Wall anchors in many cases are small plastic ice-cream cone looking bits that are inserted into the drywall where you make a hole for a fastener. A regular screw is screwed into the wall anchor and as this is done, the anchor will expand behind the wall and put lots more holding force on the screw so it can’t pull out of the soft drywall. Your security system kit may or may not come with the proper hardware for your installation.
Indoor Viewing Angle Obstructions
Cars aren’t the only thing with blind spots.
Security cameras, especially the indoor ones, can have blind spots due to walls or large objects within a home. Have you got enough clearance from a wall or furniture? While replaying your footage you notice that a wall or furniture comes into view and blocks out the person or thing you tried to record. The solution is obvious, move the camera, or move the object. One will be easier than the other. Take this into account and plan accordingly to your individual needs.
Also glare from glass such as an entertainment center door will take away from a quality recording. Night vision especially will have a tough time recording anything watchable if the reflection from the LEDs glowing overpowers the camera vision.
Indoor Wireless Cameras
Indoor wireless cameras are in simple terms, a web cam. The transmit to the WiFi router you told it to, and now access to it camera video can be seen by means of an internet connection. The camera itself will have an address for the browser and this, alone with a security password check, will grant you a look into your home or business.
So what does a wireless IP camera need. It still needs a power plug. Yes its not battery operated. Although…keep reading. Or if you can’t wait to see battery powered wireless cameras. It also depending on what model you may have, needs connection to the router via cable for configuration. But they all need a power lead. So this can be done the simple sting a cord way, or if your home is something custom, a hidden path for wire could be your call.
Routing Power Wire
Routing power leads for wireless cameras can generally be done with a wall wart power adapter and nothing more than that. But is you like to get fancy and know for sure this camera is sitting ‘there’ for a long time then it would be a great design to fish the wire from a light circuit in your home (we are not responsible for what you do with this information) and power it from the fuse box. This is more a technique for outdoor security cameras or a home array which spans the entire home room by room. A large multi-channel security system could benefit greatly from having its own circuit with circuit breaker adding safety to the entire home.
WiFi Reception
Heavy materials such as walls or floors and ceiling can dampen signal and may present choppy or grainy signal noise.  This should be avoided as to not disrupt the IP connection. Most of the IP cameras we sell have excellent transmission and reception ability. As long as you don’t use it across a lake or field you will be fine.
Indoor Wired Cameras
No wireless camera will have 100% perfect connection and feed quality. There will be some ‘wireless’ related hiccups. Now wired isn’t concerned with that. Its hard wire point to point transmission will get data to a from every time all the time. As long as power is present. Now the indoor wired camera can be of two schools. The close-to-computer and sits on the same desk as all your other computer stuff kind, and the multiple channel mount to ceiling kind. More accurately its a web cam vs. a security system. Now a web cam can double as the other. But as far as mounting or wiring as IP camera really sits in the vicinity of the computer controlling it.
Now if a 4, 8, or 16 channel systems is your thing, then wiring can be a new level project. For new home construction placing wires may be a beautiful thing once your moved in and have the system active. To the already built home, it may take a fishing expedition to route all wiring to its correct homes.
Routing Video/Power Wires
Many kits today will come with the equivalent of 16ga wires for power and a USB style cable for video. When running these two types of wires together it can be noted that power wires and power cables can give off magnetic flux and this is why video cable typically has that braided strand along the length of the cable. Understand that a quality modern wire for video will have good insulation preventing such flux from bothering anything. But it should be a practice to route video wires away from junction boxes or known circuits . Give at least a good 12″ if you can.
Outdoor Camera Placement
On to most used camera placement location, the great outdoors. Most things that can harm us come from outside the home. So its totally understandable that watching whats coming your way is a favorite line of defense for many. Where should you place your cameras? In a bush? On a tree? In the corner of the porch? Let’s thinks about this together to get the best security camera placement possible.
Foreseen weather related problems or too easy of reach can be unwanted for camera positions. Outdoor security cameras need a bit more thought so here we go.
Exterior Security Camera Concepts
Not all security cameras are made for the outdoor landscape. They each have a job to do when the designer had the concept in mind. Indoor cameras are like inside cats. They get to stay warm and dry and fed…well yea. They are pardoned from any hard work in the yard. So here come the outdoor security cameras. Try sitting under a gutter for seven months straight! Your cameras are going to work hard for you. What makes the best security camera for outside the house, and not for indoors?
Start with a metal chassis to take any hard impacts from debris or vandals. Keeping the electronics and lens intact for evidence recording. Next the shape is different than that of an IP network camera. It can be either dome style or bullet style and give the user an ability to mount them. Not just sit them on a shelf. So outdoor cameras have strong armor and mounting features, and they also have a sealed chassis. There are not open ports as on and IP camera for homes. The components are kept clean and dry with silicon gaskets and wire grommets giving years of trouble free service. No water damage or corrosion will occur as long as the seals are in working order.
“So where should I mount these?”
Hopefully you can partially answer that question already. Where is the best security camera placement for said cameras? How about a walk around the house. Let’s go…
Gutters/Debris
Lots of folks will put cameras under the eves of the home where attic ventilation takes place on more modern homes. This location is fine as long as there is real wood structure behind the ventilating panels. Unsupported vinyl panels don’t have the strength for holding a metal camera. Now take note of the gutters, do the sit atop or close to the cameras? These gutters may get clogged from time to time, ours do, and it creates a waterfall effect over the side of the gutter. That’s the last place a camera should hang. Cameras don’t need showers and shouldn’t get one either.
Debris from the roof line sometimes comes down with rain or gravity so don’t get a camera in this path. Clean cameras are happy security cameras. Grit from shingles and leaves and branches are good examples of items your security camera system should avoid.
Outdoor Wall Mounting
Exterior walls are made of many different materials. Brick, wood, vinyl, stucco, um,…what else? There are a ton of home wall types out there. People love to style the house they live in and custom siding is one of the ways they will express that love. So to cover all home types here would require an entire website for that topic. But we can help.
Outdoor Wall Structure
Outdoors brings rain, dirt, debris, snow, eggs, er… walls need to be tough and sealed from moisture in the air on a beautiful quiet morning with dew everywhere.  Or other damp weather conditions. Tapering with outside walls means your job is to leave it just as well sealed and covered (or maybe better) than before you touched it. Mounting a five pound surveillance camera with #12 or better screws will leave some gaps or spaces in the siding.
Drip, Drip
So care should be taken to avoid rain running down a vertical surface such as a wall or roof and draining directly behind the camera swivel base. Perhaps the use of silicon sealant around the base could channel any water shed away from the mounting points. This IS different than silicon cement or silicon adhesive. So you know when you get some. Mounting to a horizontal plane like your porch ceiling won’t have an issue with water shed. It will have to deal with spider webs from time to time.
Here is a great Home Improvements resource with some great builders that may offer more exterior wall assistance when custom installing your security system.
Outdoor Viewing Angle Obstructions
Think about your eyes for a moment. They relay messages to you about how they are doing at any moment. Doing good, oh that’s bright, OUCH that’s bright, and maybe a hey, that’s dark, too. A CCTV camera or even great 1080P HD camera like this XXXXXXXXXX react to outside conditions much like your eyes do. A camera won’t enjoy full sun for 14 hours a day and neither would you probably. A lens can do its best when its a good amount of light yet not glaring and not too dynamic as far as light to dark in one place. So a dark cave next to a full sun chrome garden ball will give an unwanted result for your video footage. Keep surround light sources and obstructions such as bushes or trees in your plans as your security camera system project unfolds. You love projects just like the rest of us don’t you? Knew it.
Outdoor Wireless Cameras
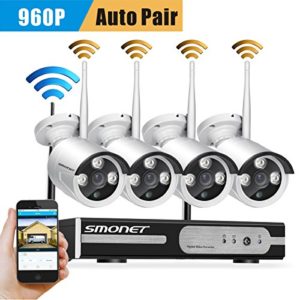
Wireless is fantastic. But its like the electric car. Limitations. Dang. Wireless cameras are all the latest rage yet the name should be ‘one wire less’ because that’s kinda what it is. But it does some really great things as well. Check Smonet for a great line of wireless systems with 4 or more cameras. This Smonet 4 Channel Wireless Camera System was #2 on our Best Rated of 2017.
Routing Power Wire
No transmission line means only power lines are needed. Power lines such as AC outlets are common outdoor features and they may be pre-installed already. Power cabling has grades of wire specific for underground runs and can be buried for security and cosmetic reasons. Be sure to check if underground lines exist before digging. So its a matter of merging camera wires to house circuit wiring. Also without video transmission wire it can’t be cut or vandalized. That’s good. These cameras and DVR run off an included 12V supply pack. It does plug into 120V AC. This means running a line out to a camera would not carry the life threatening current associated with live house power. Great news for safety.
100% Wireless…mmm
A few cameras have the ability to go 100% wireless. meaning they contain batteries as their power source. Arlo is an example of this technology. The VMS3230 from Arlo 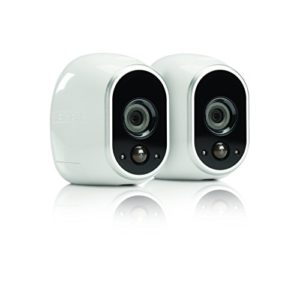 has two HD cameras and magnetic chassis for plunking into place.
WiFi Reception
Now what about reception. Wireless outdoor devices have good range but do glitch up on occasion. Bad weather or objects blocking or bouncing radio waves can affect your systems performance. Try the range out before you install it in place. Best practice for security camera placement is near or on the home structure. This keeps it hidden for the most part and reception will be optimal too. A driveway alert sensor may be an additional route you can take if long range notification is in your interests. But as far as wireless outdoor security cameras they tend to nestle closer to home than farther.
Outdoor Wired Cameras
Experience in this field may be helpful. It can involve fishing wires through interior sides of walls, digging and laying wire in trenches and the burying them. It really depends on your level of customization. The manufacturers do their best to make thing simple and quick. This 8 channel Zmodo will install easy and has an amazing video clarity.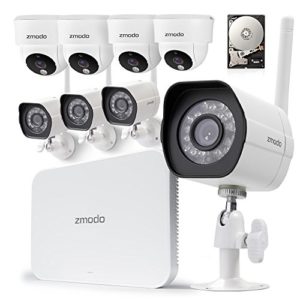 For the most part things are. But a few of us take extra time and craft things to our liking. This is were most skill and knowledge come in.
Routing Video/Power Wires
The key concept here is weather proofing and vandalism proofing. Keep it clean and hidden and secured and it will last years and years. When complete security kits aren’t wireless they need runs of wire for the 12V cameras and video wire for the processed signal. If you can run one wire you can run two in the same place so that’s not a huge deal really. But as we mentioned before, a skill set is needed to cleanly route and hide multiple cameras worth of wiring. A website called stackexchange has great tips on routing wire through your outside walls.
Mother Nature and Electronics
The Camera Stayed Dry, No Really!
Yes, Corrosion on PCB’s will be the end of the day for an electronic device. How ever makers of the best equipment in the world spend countless dollars in search of corrosion-resistance, rust preventive, moisture barriers and so on. The labs have extreme experiments to test products and mechanisms, which is why many of the worlds security companies do a darn good job with quality.
But Mother Nature can do what she wants. Intense dew and temperature changes alone with UV rays breaking down materials on a slow time table weaken your system components. Having features such as metal chassis and silicon based seals keep them lasting year after year.
Once water and electric current are together on a PCB board it begins to grow corrosion on metal legs of resistors or ICs. This will grow and permanently damage a PCB. Without good chassis seals and housing design improvements cameras would have a high failure rate.
Conclusion-
This guide hopefully helped someone realize a concept or idea maybe they didn’t think of before. The best installation and assembly is with strong planning and seeing the vision in your head prior to it being reality.
The best placement for a security camera is one that is dry with good available lighting, and wires out of reach. Also the camera itself should be out of reach if possible. Don’t be afraid to re position things if its not right. That’s called live and learn. Thanks for reading our page and visiting camerasecurityreviews.com.
